Boat:
Doing research on different posibilities. We really like Baltic Trader style boats, but they are scarce on this coast and tend to be rather expensive when you find them or needing extensive work. I don't mind all kinds of refitting but I shy away from hulls that need framing/planking/fastening. When your budget is almost non-existent your options are limited.
Captains Licenses:
Making progress on learning the COLREGS. and finally starting to pass most of the practice tests on the computer.
I have been putting together more tutorials on knots and Mrs. Afloat has been learning to bake a new kind of yeast bread that doesn't need to rise (and it is fantastic).

Thursday, October 21, 2010


Tuesday, October 19, 2010
Basic Knotwork, Stopper Knots
Stopper Knots are used to keep a line from accidentally freeing itself from its bock, fairlead, or tackle. The most basic stopper knot is the overhand knot. It is quick and easy to tie and is unlikely to come undone. Unfortunately it is rather small for a stopper knot and can be very difficult to untie once it is tightened down all the way. A double overhand is bigger but even harder to untie. The Figure Eight knot is probably the best all-around stopper knot, and is also used for many other applications. It is almost as fast to tie as an overhand, but is bulkier (a good thing in a stopper knot), holds better, and is easily untied even when over-tightened. For occasions where a very large stopper knot is needed, Ashley’s stopper knot is an excellent choice. Clifford W. Ashley, author of the Ashley Book of Knots , developed this knot after seeing a large stopper knot on a passing boat.

 Tighten the knot but pulling both ends.


I made a short video of tying these knots to show how you tie them in hand.
, developed this knot after seeing a large stopper knot on a passing boat.Overhand Knot

Make a single turn in the line then pass the end through the loop. To tie a double overhand, go around and through the loop again.


Finished.
Figure Eight Knot

Make single turn in the line and bring the end around behind the standing part.

Pass the end over the line and through the loop.

Pull tight.

Figure eight knot as it is normally tied.

Figure eight tightened for use as a stopper knot.
Ashley’s Stopper Knot

Make a single turn in the line and form a loop in the standing part. Pass the loop trough the single turn.

Tighten the knot by pulling on the end and the side of the loop leading to the knot.
This is a common Slip Knot.

To make it into an Ashley’s stopper knot pass the end through the loop.

Pull the end tight against the knot and then tighten the loop by pulling on the standing part of the line.

Finished
I made a short video of tying these knots to show how you tie them in hand.
Sunday, October 17, 2010
Basic Knotwork, Whipping
Rope plays an important role aboard any boat, from the smallest dinghy to the largest cargo ship. There are many types of rope (or, in the nautical world, line) used on the sea but they all have one thing in common: fraying. The simplest way to prevent the end of a line from fraying is to tie it in an overhand knot. This solution, however, is far from satisfactory or even practical- the knot makes it impossible to thread the end through small holes or blocks, and makes tying knots difficult. Synthetic line can be fused by heating the fibers until soft and melting them together. Natural fibers cannot be fused- they burn rather than melt. This brings us to whipping: the other common (and in some people's opinion most shipshape) method of securing the end of a line from fraying. Whipping is basically wrapping the end of a line with something- usually waxed or tarred cord, occasionally fine wire, and sometimes (regrettably) adhesive tape. Even a synthetic line that has been fused can benefit from having the ends whipped.
There are three main types of whipping: Common Whipping, Improved Whipping, and Sailmaker's or Palm-and-needle. Common whipping is the fastest and easiest but the least secure. Improved whipping is just that- more secure and only a little slower. Sailmaker's whipping is rather slow but very secure.



There are three main types of whipping: Common Whipping, Improved Whipping, and Sailmaker's or Palm-and-needle. Common whipping is the fastest and easiest but the least secure. Improved whipping is just that- more secure and only a little slower. Sailmaker's whipping is rather slow but very secure.
Common Whipping

To secure the end of a line with common whipping you need waxed cord and some means of cutting it. In the illustrations I am using ¼" braided cotton rope.

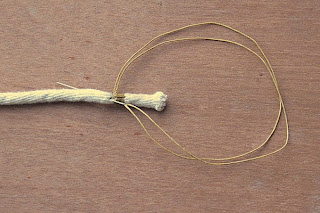
Make a loop in the cord, lay it along the rope, and take a turn around to secure it.
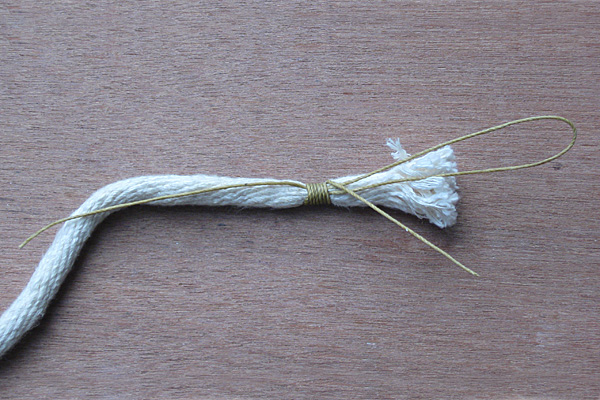
Continue serving (wrapping) until the served section is about equal to the rope's diameter.

Tuck the working end through the loop (making sure to keep the serving tight) and use the other end of the cord to draw the loop closed.

The working end is then drawn HALFWAY under the serving. Care must be taken at this point to avoid pulling the loop all the way out. If this occurs you can pull the working end back under the serving.
Trim the off the ends of the cord. Here is one technique to avoid damaging the rope: Position the edge of a sharp knife against the cord, as close to the serving as possible, and pull the cord back and forth against the edge of the blade.
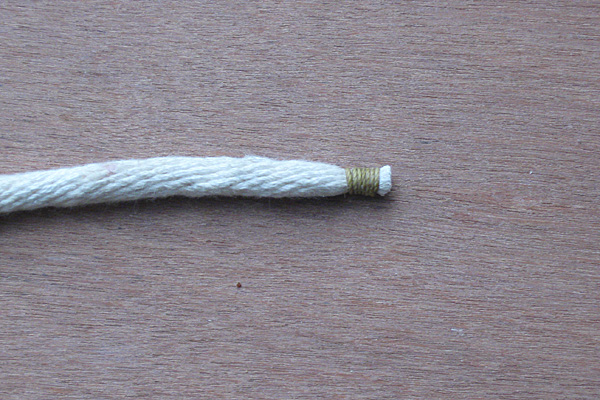
Here is the finished whipping.
Improved Whipping

For Improved Whipping you need the same tools with the addition of a second piece of cord or a wire with which to draw the end under the serving.

Lay the standing end (the stationary end) along the end of the rope and take a turn to secure it.

Then add the loop (in this case a piece of cord) and continue serving.

Continue until the served section is the same as the diameter of the rope and tuck the working end through the loop.

Using the loop, pull the working end all the way under the serving and out the other side. The picture shows this step partially complete.

Trim the ends.

Finished
Sailmaker's Whipping

The tools needed for sailmaker’s whipping are the same as for the other types with the addition of a needle. For larger rope you would need a sailmaker’s palm, which is a cross between a thimble and a glove.

Thread the needle, bringing half the cord through the eye so that you are working with the cord doubled.

Take a stitch through approximately 1/3 of the rope. If you are using laid rope, stitch under one of the three or four strands. Then lay the standing end along the end of the rope.

Serve until you have a section equal to the diameter of the rope.

Take another stitch like the first one and pull tight.

Bring the cord to the starting side of the serving (for laid rope you would “worm” it, meaning that you would follow the curve between two of the strands) and take another stitch.
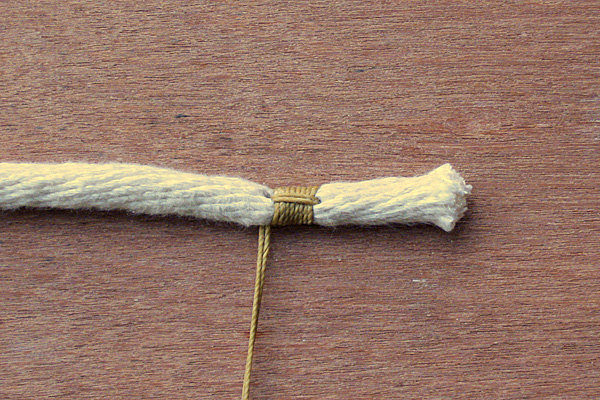
Here is what the whipping should look like at this point.

Bring the cord to the other end of the serving and take a stitch, again through ~1/3 of the rope and go over the serving again and take a final stitch The goal is to have the three (or more) worming stitches evenly spaced around the rope.

At this point the cord should be near the end of the first worming stitch. Pass the cord under it and pull tight.

Bring the cord around the worming stitch and push the needle into the center of the rope. Pull the cord a bit too tight, so that it will work back into the center of the rope after it is cut.

Finished
Godspeed
Sunfish
I was asked by my sister-in-law to help her inspect and transport a sunfish sailboat that she was interested in purchasing. So we all (the three Afloats, grandma and sister in-law) piled into grandma's CRV and headed an hour and a half down the road to look at the boat. It turned out to be a pretty good value and after a good once over my sister-in-law became the proud owner of her first registered vehicle.
After the routine paper work to keep Uncle Sam happy had been taken care of we turned our attention to getting the boat home, a task that was rather more difficult than I had at first thought. Having already checked the rating of the roof rack on the CRV, and found it to be half the weight of the boat we had brought some 2x4s and old towels to help take some of the load. it was a rather delicate task owing to the sunroof and the thin sheet metal of the roof.
Here are some pictures of the process:
 |
| Deciding where to begin |

 |
| Tying the first of many butterfly knots |


 |
| Tightening down the diamond hitch. |
 |
| Grandma, Baby Afloat, and Sister-in-law inspecting the lashings. |


 |
| First Pink Slip! |

 |
| Ready for the trip home |

 |
| Rigging her for the first time. |
 |
| Making her shipshape. |


 | |
| Sister-in-law and her yacht. |
Godspeed
Tuesday, October 12, 2010
Update
Making progress on the COLREGS, learning about all the navigation lights and day shapes. As you can see the last coupe of days were spent working on a major overhaul of this blog.
I will (Lord willing) be adding a recommended reading list with links to amazon.com of all the book that we are using and talking about.
Godspeed
I will (Lord willing) be adding a recommended reading list with links to amazon.com of all the book that we are using and talking about.
Godspeed
Friday, October 8, 2010
Update
Still working on the COLREGS up to #25 this morning. Found a great little boat online yesterday called a Seahopper. It is a folding dinghy that can be sailed, rowed, and even take an outboard motor. Might have to make one of those.
Godspeed
Godspeed
How to Get a Boat
There are almost as many ways of acquiring a boat as there are different kinds of boats. The main ways are building, buying, bartering, and rescuing. There are also many nefarious ways to get a boat (piracy, gambling, etc.) but I’ll leave those to your imagination.
Building has several subcategories. The self-built or D-I-Y (Do It Yourself) method involves designing the boat yourself and then building it. The advantage of this method is that you control every detail of design and construction. The only limiting factors are your skills, time, and materials. For a skilled jack-of-all-trades or someone willing to take the time to learn the skills this method is an excellent way to go. The downside is that the time required can run into thousands of hours. A variation of this method is to do part of the work yourself but hire skilled craftsmen for the rest. Buying plans or kits is another popular way to eliminate some of the more technical and difficult parts of the process.
Commissioning a naval architect or yacht designer to design a custom boat and then taking that design to a builder is probably the best way to get exactly what you want quickly. Unfortunately it is also likely to be the most expensive.
Buying a boat is the best way for most people to get a boat. Some of the common ways to locate boats for sale are boat shows, yacht brokers, online listings, local classified ads, and marina lien sales. Going to boat shows is an ideal way to see a lot of different boats and talk with many brokers about them. Even if you are not planning on purchasing a boat that day it can be a good investment to go and see what is available.
A reputable broker can take a lot of the headache out of finding and buying a boat. The broker will have a working knowledge of the current market conditions as well as what boats are available. In addition, they act as go-between with the seller. One added benefit of using a broker is not having to worry as much about scams and fraud. Online listings, such as Yachtworld, are an excellent place to look for boats listed by brokers. The CPYB (Certified Professional Yacht Broker) website has lists of certified brokers and broker organizations.
Online listings such as craigslist are a good place to find boats that are for sale by their owners. As with any private party transaction, the chances of getting a really good deal are higher for knowledgeable buyers, but so are the odds of getting ripped off if you are not careful. “Buyer beware” should be your motto in situations like this. However, many boats are listed online because the owner needs to make a quick sale, and as a result can be an excellent value.
Local classifieds are another good place to look for a boat in your area, though you should take the same precautions as when using online listings.
Many marinas allow For Sale signs to be posted, so it is possible, though more time consuming, to search through local marinas for boats. When a boat is abandoned at a marina it will often be sold to pay for the back slip fees. These Lien Sales can either be auctions or simple sales.
Bartering is becoming more common, especially using the internet to connect with people willing to trade. Often you can trade up or down from the boat you have with someone wanting the opposite. The difficulty with barter is finding someone who has what you want, and wants what you have instead. Also, bartering comes with tax issues that can be a hassle. The best way to successfully barter your way to the boat you want is to advertise what you have to trade, and what you want for it.
Rescuing a boat can be a great way to get on the water…eventually. More common with older, wooden-hulled boats, rescue involves taking a boat that no one else wants (usually it has been abandoned, or has been sitting on the market and the owner no longer wants to pay the storage costs) and restoring it. Free boats are seldom actually free but can be a great deal as long as you know what you are getting in for. For more on free boats please see the post on that subject: Free Boats.
All of these methods can be combined in different ways to meet different requirements. For example, you can buy a boat, then customize it to be what you want, or combine goods or services with cash to trade for a boat.
Subscribe to:
Posts (Atom)